This is the first cake we’ve done from the cookbook.  While I was very excited about getting to bake a cake (who doesn’t love cake??), I was also very skeptical.  Olive oil in cake?  And no butter?  What kind of blasphemy is this??  Never being one to back down from a challenge, I tackled the recipe head on.

The first ingredient:  all purpose flour.  Check.

The second:  buckwheat flour.  Halt.  I only keep all purpose and whole wheat on hand.  I didn’t even look at Winn Dixie for buckwheat flour when I was there earlier in the week.  I called New Yokel to see if they had some.  I was going to the farmer’s market on Thursday anyway, so I would be close by.  They had some, but it was $6 and some change.  A little steep for flour in my book, especially since I wasn’t even sure if I would like it.  $6 helped me make the decision to use the whole wheat flour suggestion from the What Else? section.

Number three:  ground blanched almonds.  Shoot.  None of those either.  I looked at a couple stores and only found whole almonds.  I was at the Evil Empire getting a fishing license so I bee bopped over to the nuts to see if they had some ground almonds.  Still no dice.  I bought a bag of whole almonds and decided to deal with it after camping.  Turns out you can blanch the skins off whole almonds and grind them yourself.  Who knew??  Not this gal.  But I’ll tell ya, blanching and peeling almond skins takes dedication.  I poured boiling water over some almonds in a bowl.  I allowed the almonds to sit in the water for a minute or two (I was in the middle of cooking with a rowdy 3 year old running around, so I lost track of time) and rinsed them in cold water.  Dinner was ready, so we ate and peeled the almonds after dinner.  Little Guy actually liked peeling them.  Mommy was not so entertained.  All I was thinking was, “this cake better be dang good”.  The almonds took a ride in the food processor and presto! ground almonds.  I peeled way too many, so I had about a cup left over.  I’m gonna find a really fantastic recipe to use those in.

The other ingredients were basic cake ingredients with the addition of orange juice and zest.  I did cut back on the sugar a tad after reading Alicia’s post.  The cake came together really quickly at this point.  Dry ingredients in one bowl.  Wet in another.  Whisk together wet, fold in dry.  Check.  Check.  Check.  The batter at this point smelled and looked a little odd.  The orange was very sweet and fruity smelling, the almonds quite nutty after their trip in the FP, but then there was this really strong olive oil smell.  It had me wondering how much of that olive oil would stand out in the finished product.  The batter was also very runny.  No turning back now.  I poured it into my prepared 9 inch pan and baked it for 30 minutes at 350.  I let the cake cool while I read Magic School Bus to a still very rowdy toddler.  After goodnight hugs and kisses, I turned the cake out onto a cooling rack and had a taste (a very small taste because I was still very full from dinner).

The cake was super moist.  It had a course texture I wasn’t quite expecting.  I think it was the almonds.  I don’t have the nicest food processor (ahem, Santa…), so they didn’t grind nearly as fine as I wanted.  The orange really stood out.  I used some super sweet and juicy navel oranges.  Their freshness shined alongside the nutty earthiness of the almond.  The olive oil taste that I was so worried about wasn’t noticeable at all.  While the cake was pretty good, it seemed like it needed something.  It really seemed more like a “vessel” cake deserving of a topping.  Oh yeah, the vanilla mascarpone cheese.  I didn’t buy any of those ingredients either.  Both vanilla beans and mascarpone cheese were a little too expensive for this week’s grocery budget, so I bought some strawberries and cool whip.  It made a good pre-run snack this morning and Little Guy enjoyed a piece before dinner.  This weekend I plan to try the cake again with some toppings.  Would I make it again?  Maybe, if the mood for a cake strikes and there is no butter or milk in the house.  But then again, that rarely happens around here.

I’m a little late blogging last week’s recipe.  I made the Spicy Black Beans Wednesday, but didn’t have time to write before our family camping trip this weekend.  This recipe was a very simple dish to prepare.  This has been one of the quickest things to cook from the selections so far.  I think it took all of 15 minutes to put together.  She makes mention of it being easy enough to make with a toddler underfoot.  I second that opinion, as I had a 3 year old and a dog under my feet the whole time.  The idea wasn’t completely original though.  I’ve made dishes very similar to this many times before.  In fact, my best-friend/former-neighbor makes a righteous version of black beans and rice.  She uses ham in hers with tons of chopped veggies and spices.  That was always one of my favorite bowls of leftovers to get from her.

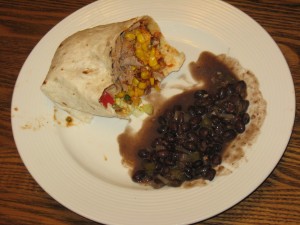
I opted to make this as a side dish (sans the rice) to go with our pork burritos.  I didn’t have any chorizo. To be honest, I forgot about it when I did the weekly grocery run.  I also forgot a jalapeno and red bell pepper. Since it was 5:40 and I was NOT going to the store, I improvised with some green bell pepper and a few shakes of crushed red pepper.  I kept the spice fairly mild for Little Guy.  Had I known he wasn’t going to touch his beans, I would have made them much spicier.  The only seasoning she called for was oregano, cumin, and salt along with the sauteed aromatics.  I didn’t want to stray too far from her idea, so I left the seasoning with that.

I found the flavor of the end result to be a little bland.  She suggests hot sauce to taste.  I thought the beans really needed it.  And some more salt.  And pepper.  I think these beans would have been much better if they had time to simmer longer or even sit overnight.  Having the chorizo or even some sausage probably would have helped impart more flavor.  Would I make this dish again?  Yes, but more in my own way with extra cumin, cayenne pepper, chili flakes, and black pepper.  Oddly enough, she calls for lime juice in every other recipe except this one.  This is one place the lime would have really come in handy.

One option she suggests is topping the black beans and rice with a fried egg.  Before reading this cookbook, I never thought of so many things to top with a fried egg.  This woman will stick a fried egg on anything.  The idea is starting to grow on me though.  The next time I make black beans, I want to try the egg idea.

The pork burritos I made deserve a mention all of their own.  I fashioned them after one of my favorite burrito combos from my favorite burrito spot, Caliente Grill.  I love to get their pork burrito with pinto beans, cilantro lime rice (sometimes), corn salsa, chipotle bbq sauce, cheese, and lettuce.  Flavor party in your mouth.  The one I made at home started with some leftover boston butt my neighbor smoked.  I topped it with sauteed frozen pepper mix, corn, bbq sauce, salsa (made from the Pioneer Woman’s recipe), cheese, sour cream (for Big Guy, not me) and lettuce.  Almost as good as the original.  Maybe that would be good topped with a fried egg too?  I wonder.

Time for a bonus recipe!  In the back of Cook This Now, Melissa Clark previews some recipes from her cookbook In the Kitchen with a Good Appetite.  She describes this selection of recipes as dear to her heart and several are named for her mother or a person.  The bonus recipe for March is Kate’s Impossibly Fudgy Brownies with Chile and Sea Salt.  Now, I’m not sure who Kate is, but she sure can bake good brownies.  I made this recipe a couple weeks ago.  When I saw it added to the list, I couldn’t wait to make them.  I did make myself wait until March even though I was tempted to try them in February.

The recipe is a standard brownie batter with the exception of two unique additions: sea salt and cayenne pepper.  The batter came together very easily.  Can I just interject here a moment: made-from-scratch brownies are so simple to make.  You should really give them a try before reaching for the box mix next time.  You have much more creative power by making them yourself.  You can adjust chocolate ratios, types, mix-ins, etc. to create a wonderfully unique brownie.  I only have one rule about brownies:  use good butter and don’t skimp.  I’m convinced it is the secret to the perfect brownie.  And I used the full 2 sticks and 2 tablespoons in this recipe.  Back to these brownies:  the cayenne got mixed in the batter with the flour and salt.  I did skimp on the sugar just a tad;  2 1/2 cups just seemed like overkill.  Once the flour mixture was folded into the chocolate mixture, the batter was spread onto a 9×13 inch baking sheet.  The top got an even sprinkle of Maldon sea salt before baking in the oven.

These brownies were really fudgy.  The recipe called for just the right amount of flour to keep them from being too cakey.  I would certainly use this brownie recipe again as a base for other mix-in ideas.  The chile part was very subtle.  I didn’t even notice the tiny bit of spice until after I ate the brownie and wondered what that little tickle in my throat was.  Next time I will up the cayenne a bit and see if it makes the spice a bit more noticeable.  The most intriguing part for me was the sea salt.  I love the mix of sweet and salty.  This recipe brought chocolaty to the party and things got really fun.  I shared these brownies with many different people and made sure to get a review from everyone.  People were divided; they either said yes or no.  The no’s were mainly turned off by the salt.  Everyone was tricked by the cayenne.  It was barely noticed by tasters until I mentioned it was in there.  That usually led people to reach for another to see if they could taste it again.  I cut these in small bites and was very glad I did so I had plenty for sharing.

Corned beef and St. Patrick’s Day go hand in hand, so Baked Stuffed Potatoes with Corned Beef and Dill Butter was the perfect choice for this week.  Our schedule did not exactly go as planned for us this week, so my recipe had to wait until the weekend.  My original plan was to corn my own beef.  I’ve never made corned beef before, so I thought it would be fun.  I looked into the process of corning beef.  It takes a while.  Like 10 days a while.  Other than the time, it’s actually pretty easy.  You mix together a pretty basic brine mixture and keep a beef brisket submerged for 8-10 days.  After brining you cook the meat with a special mixture of spices for 2 1/2 hours until tender.  I didn’t have time to babysit a brisket for 10 days, but I didn’t want to just use deli corned beef either.  I settled on buying a pre-brined corned beef from the grocery store and cooking it myself.  I didn’t have a 2 1/2 hour block of time to babysit a corned beef cooking either, so I decided to put the slow cooker to work for me.  I put the corned beef with carrots and potatoes in the crockpot before I went to bed Friday night (at midnight if you must know) so I would at least have the meat cooked and ready when I found time to bake my potatoes.  Saturday morning we woke up to a house full of smelly goodness.  I couldn’t resist tasting my first home-cooked corned beef.  I took out half the meat and a good portion of the potatoes and carrots and made corned beef hash.  Topped with a fried egg and served with some Breadsmith butter bread, this was a very filling and festive Saturday breakfast.  And very delicious.

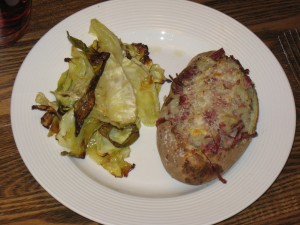
The hour worth of time required to bake potatoes didn’t present itself until Sunday evening.  The author shares her method for baking crisp-skinned potatoes.  The only prep used is rubbing the skin with salt and baking at a high temp (425).  I usually wrap mine in foil, so I decided to give this a try.  I put the potatoes in the oven before leaving for a wake I had to go to.  I left Big Guy in charge of taking them out for me when they were soft.  I liked Maria’s idea of the Crispy Roasted Cabbage as a side dish, so I gave Big Guy instructions for getting that started via text message so it would be close to finished when I got home.  He did an excellent job with both his tasks, so all I had to do when I got home was stuff the potatoes.  That part was pretty darn easy.  All it required was scooping the potato from the skins and mixing it in a bowl with the corned beef, butter, salt, pepper, and dill (couldn’t find fresh so I used dried).  I topped the potatoes with freshly grated Parmesan cheese and popped them back in the oven for 10 min to warm through and melt the cheese.

With so few ingredients in the potatoes, I was anxious to see how much flavor they would have.  In this case, less is more.  The salty meat did a fine job flavoring the potato.  The dill did a good job of brightening the flavors.  The potato skin turned out crispy and salty.  I had to restrain myself from getting some extra butter out to smear all over the skin as I ate it.  The cabbage was the perfect side dish.  Big Guy and I both cleaned our plate.  We really enjoyed it.  I think if I were to make this again I’d be tempted to make the potato more “reuben” and add some sauerkraut and thousand island.  The way the corned beef looked in the potato also made me think about pulled pork in a potato.  And considering the boston butt smoking kick me and my neighbor are on, that may just happen sooner rather than later.  I’m thinking BBQ sauce, jalapenos, and cheese will be involved somehow.

Last week’s recipe was Gingery Split Pea Soup with Toasted Coriander.  I did make the recipe, I just didn’t blog about it.  I didn’t have enough to say about it to make an entire blog entry.  Here’s a quick run down.  I used the red lentils I bought for the previous soup.  For me this soup was very similar to the red lentil soup.  It was a good soup, very flavorful and gingery.  I’m sure using split peas would have made it different, but I was lazy and didn’t feel like going to the store.  I made a chicken dish from my Madhur Jaffrey cookbook to go with the lentils and some store bought naan turned it into an Indian meal.  See, not very noteworthy.

Now on to this week’s recipe.  This is a recipe from the February section we skipped around.  I was dreading this recipe for two reasons.  Reason #1:  coconut milk.  It is not my favorite thing.  Alicia suggested I use light coconut milk, as she finds it not as strong tasting.  Reason #2:  beef short ribs.  I’d much rather eat pork ribs any day of the week.  My neighbor had some beef ribs from the cow he had slaughtered this year.  He’s like me and prefers the oink oink, so he gladly gave up his beef ribs for the cause. 

I had to make this on the weekend because the meat had to cook in the oven for 2 – 2 1/2 hours.  The ribs got started with a generous sprinkle of salt, pepper, and chili powder and seared in a hot pan on all sides.  I removed the ribs from the pan and sauted the aromatics (garlic, onion, ginger, jalapeno, cumin seeds)  in the same pan.  Once that softened, I put the ribs back in the pan and added the coconut milk, some water, and the zest and juice of two limes.  I must admit, that was a big pile of lime zest, and I was a little worried.  That much lime with beef and coconut??  The pot went in the oven for the full 2 1/2 hours until the meat was tender.  I served the ribs over plain white rice with some roasted carrots.  She suggested her Coconut Rice and Peas as a side dish, but I wasn’t brave enough to try more coconut milk dishes without knowing how this would turn out. 

The verdict:  better than I expected.  The ribs turned out very tender.  I went out on a limb and didn’t skim the fat since she claimed it was a good, flavorful fat that makes the sauce rich.  I’m not so sure about that.  I’ll opt for skimming next time.  I’m still not crazy about beef ribs.  There was too much fat and other stuff that had to be trimmed away to eat it.  Big Guy did not like that part.  He’s VERY particular about the fat on meat thing.  The lime was almost too over powering, but I think it complimented the coconut milk nicely.  It probably kept the milk from being too sweet in the dish.  I felt like the meat could have used more seasoning though.  Big Guy agreed.  He didn’t dislike it, but he did think it could use something else.  Little Guy ate rice with soy sauce and the carrots.  For some unknown reason right now, he thinks rice can only be consumed after it has been sprinkled with soy sauce.  “It’s my favorite!” as he puts it.  Who am I to argue?  We ended up with a lot of leftovers.  I sent them to my friend’s carnivore husband to finish.  They weren’t his favorite, but he ate all of them, so they must have not been too bad.  The man does love his meat though.

I don’t know if I would make this dish again as written, but I am curious to see how this sauce would be on other meats.  A cheap braising steak, like a london broil, would probably be good with the sauce and not have the fatty cartilage thing going on.  Maria suggested salmon would be good with the sauce, and I agree.  I think salmon or even shrimp would be yummy with the lime and coconut milk combo.  I would like to make this again using the garam masala in place of the chili powder like she suggests in the What Else? comments.  Maybe I don’t dislike coconut milk as much as I thought.  I’ll certainly give that part another try.

I’ve not always been a fan of cabbage. I only started eating it a few years ago. The cabbage that changed my mind was from this lady that used to cater in Hattiesburg. She called her business Juke, Jazz, and Jambalya. Man, that woman could cook. I work in a medical office where we have reps bring us lunch everyday. We would order from this lady all the time. Our favorite meal to get from her was the roasted pork loin, black eyed peas, sliced tomatoes and cucumbers in vinaigrette dressing, cabbage, mac and cheese, and cornbread. At first, I’d skip the cabbage since I didn’t like it. Or so I thought. When I finally tried her’s, I was hooked. I’d eat two plates of cabbage every time she brought it.  That lady moved a few years ago to somewhere in Texas, much to our dismay, but I will never forget her cabbage. I haven’t had any that good since.

Since I never really ate cabbage before, I never really learned to cook it until recently. It can be a pretty forgiving little vegetable. I almost burnt a pan of it one time. I added some water in hopes of reviving it. It turned a weird brown color, and miraculously, still tasted ok.  You can add just about anything to cabbage.  Bacon and ham give it a nice flavor.  I’ve cooked it with onions, bell pepper, apples, carrots.  I’ve really only tried saute/stew methods or coleslaw approaches. The roasted route was a new one for me.

This is the second Cook This Now recipe that claimed to have a “crispy” outcome. The “crispy” onions did not reach a crisp status, and neither did this cabbage. It browned, and crisped a tiiiiny bit on the edges, but not enough to claim “crispy” in my book. It was, however, incredibly easy to cook. I cut the cabbage into 1 inch thick slices, brushed them with olive oil, generously sprinkled with kosher salt, and roasted at 400 degrees for 30 minutes.  Some of the thinner slices that fell apart did crisp slightly on the edges, but the cabbage mostly steamed and turned lightly brown on the large pieces that stayed together.  It definitely benefited from that generous sprinkle of salt.  It really flavored the cabbage, keeping it from being bland and boring.

The fun part about this recipe is seeing what everyone else in our group cooked with it.  Melissa Clark suggests this would be a great as an all veggie meal with brown rice and fried tofu croutons.  Umm, yeah.  Brown rice and tofu squares as a meal?  Not in this house.  Big Guy really only tolerates meatless meals to humor me.  The man likes his meat.  I made pork chops, black eyed peas, and cornbread for our dinner.  Actually, Big Guy grilled the pork chops, and the crockpot cooked the black eyed peas, so I really only made cabbage and cornbread.  The cabbage went great with the rest of the meal.  But as my neighbor said, it’s just cabbage.  No bells and whistles.  Big Guy loved it.  And the black eyed peas.  And the cornbread.  Then again, those are three of his favorite food right there.  The pork chops he could probably do without, but Little Guy and I love them, so I sneak them in occasionally.  Once again, he humors me.  Next time I’ll make the meatloaf that Dick and Sharmyn made.  Big Guy would love that dinner for sure.

This week was my turn to choose the recipe.  I originally chose the chocolate cake recipe to make for Little Guy’s birthday this week.  But as I looked at all the other recipes, I decided the cake was a little boring compared to all the other choices.  I love seeing how the rest of the group varies the recipes to their liking.  A chocolate cake recipe doesn’t offer much room for creativity.  So I changed my mind (what? me, change my mind??) and went with the fragrant lentil rice soup with spinach and crispy onions. 

I cooked my soup Sunday afternoon so I could take my time and attempt homemade naan bread at the same time.  My plan was to eat it for dinner Sunday night.  I invited my neighbor over to eat, but it turned out he smoked a boston butt and was planning to feed us.  There was no way I could turn down pulled pork sandwiches with slaw, so I decided we’d eat the soup for dinner Monday night.  The soup came together quite easy: a sautee of aromatics (garlic, ginger, onions), some spices (cinnamon stick, cumin, allspice, bay leaf), red lentils, brown basmati rice, stock, and water.  I wasn’t paying attention and added the brown rice and lentils at the same time.  The brown rice definately needed the 10 minute head start she suggests in the recipe.  The rice was still a tad crunchy and the lentils were plenty soft.  I used kale in place of the spinach and added the mint at the end and let it wilt.  My first taste-test impression:  that cinnamon stick was a bad idea.  Second impression:  was the hunt for the brown basmati entirely necessary?  I couldn’t tell that it added much to the flavor.  I think white basmati or regular brown rice would have been just fine.

Monday night made for a quick and easy dinner, just the way I like it.  All I had to do was reheat my soup and cook the crispy onion part.  I thinly sliced the 3 onions, wiped the tears from my eyes, and cooked them in butter on low until they softened.  I added some salt and oil, cranked up the heat, and cooked them until they browned.  They didn’t really get crispy, but they caramalized nicely.  I served the soup with some roasted cauliflower sprinkled with cumin seeds and a piece of rustic Italian bread from Breadsmith.  The cinnamon flavor toned down a bit after the soup sat in the refrigerator overnight, but I will leave the cinnamon stick out if I cook this again.  And since I found a huge bag of red lentils at the Asian market by Best Buy, we’ll be having this again.  The end result was delicious.  Those onions really gave the lentils a nice touch.  The soup turned out thick and creamy and was very filling.  She suggests serving the leftovers topped with a fried egg for breakfast the next morning.  I tried it the next day with an egg and she was right; it was really good and I wasn’t hungry for lunch until late that afternoon.

Why didn’t we eat the naan bread, you ask?  Well, not everything goes as planned.  I followed the recipe in my Joy of Cooking.  I even got to use my dough hook on my Kitchenaid for the first time.  I must have missed an unwritten step somewhere though because it tasted terrible.  I was so disappointed.  I threw the whole thing in the garbage.  Maybe next time, the naan will turn out better.  Or I’ll take time to cook the buttery paratha recipe she has in the book.

This week’s recipe from Cook This Now! was Creamy Parsnip and Leek Soup with Pumpernickel Croutons.  She describes the recipe as a “simple root vegetable puree” that is “something good and heartwarming to eat”.  The original recipe calls for parsnips and potatoes as the root vegetables.  I looked for parsnips at Winn Dixie.  They had them for $3.99 per a 1 lb bag.  Right next to those were turnips for $0.99/lb.  You can do the math.   I’m not very experienced with many root veggies, so I took this as chance to try my hand at turnips.  Maria suggested I add some carrots to the mix to sweeten it up a bit.

The recipe was easy enough to put together.  It involved a bit of chopping, so for a weeknight meal, it would have been helpful to have some things washed and chopped beforehand.  The soup starts with a few tablespoons of butter melted in a pot.  You throw in leeks and celery, season with salt and pepper, and let those cook about 5-10 minutes.  When those soften a bit, you add your herbage and root veggies.  My  herbage consisted of a handful of parsley, 1/2 teaspoon dried thyme, and a bay leaf.  I then added the turnips, potatoes, and carrots along with 1 quart of boxed chicken stock and 2 cups of water.  All this simmered on the stove until the veggies were nice and soft, about 45 minutes.  When the soup finished cooking, I plucked my bay leaf from the pot and put the immersion blender to work until it was nice and creamy.

My first thought when I tasted the soup was blah.  It definitely needed something.  I added some salt.  Not much help.  She did mention in the recipe to add lemon juice if it tastes a little flat.  I kept adjusting lemon juice and salt until the flavor perked up.  Another thing she suggests is Turkish or Syrian red pepper, such as Aleppo, to garnish the soup.  I need to see if Kitchen Table carries Aleppo so I can try it.  I put some cayenne pepper out, but I’m pretty sure it’s not the same.  Big Guy thought the soup needed more than pepper to garnish.  He sprinkled quite a few things (cayenne, Mrs. Dash, salt, pepper, green onions, and bacon) to get his soup “flavor-tastic”.  I thought the flavor was fine with lemon and salt.  I really loved that this soup was incredibly low-fat/low-calorie/nutritious/comforting all at the same time.

The thing that brought the whole dish together was the pumpernickel crouton part.  I called Breadsmith, the new bread store in Hattiesburg, to see if they had pumpernickel.  Boy was I in luck that Austrian pumpernickel was their weekly special bread.  The nice lady sliced it for me at the store.  I toasted the slices and rubbed half a garlic clove over the bread when it was finished.  A little smear of butter, and wow! my mouth was happy.  If you haven’t been in Breadsmith yet, stop depriving yourself and go there.  You will not be sorry.  The bread is baked fresh daily and will not disappoint.  I had the yeast pull apart rolls for Thanksgiving.  You want to be the most popular guest at dinner??  Bring those rolls.  Instant superstar status guaranteed.

I don’t play words with friends. I think it would be fun, but I’d probably be a little too obsessive about it. I could justify it as making me smarter and spending time with friends, but I just can’t seem to part with the time I’d spend coming up with words to beat the pants off all my friends.

Instead, I’ll be obsessive about cooking with friends. Apparently this is a new movement out there in the blog-o-sphere: a group of friends pick a cookbook, take turns picking recipes, and blog about the results.  Sounds fun to me.  A book club and cooking group all rolled into one neat package.  My friend Maria, who lives in France, and her sister, who lives in California, did a similar project they finished recently.  Check it out:  http://mhbakeoff.blogspot.com.  Once they finished  Maida Heatter’s book, they decided to pick a new book.  That’s where I come in.  They thought it’d be fun to get impressions of cooking the same thing in very different places, so they invited little ole me in Mississippi to join in.  Along with a few other friends, we have completed week one of  Cook This Now! by Melissa Clark.

The book is organized in monthly recipes to take advantage of fresh, seasonal ingredients throughout the year.  There are some really great recipes in the book.  My goal is to blog the weekly recipes each Thursday for your culinary entertainment, some with pictures, some without.  Though seasonal for the author (in New York) and myself (in Mississippi) varies some, I’ll just make adjustments along the way to stick with the idea of fresh as possible.  I’ll be frequenting the farmer’s market downtown (April – October), local stores, and hopefully (fingers crossed) my own backyard garden for the ingredients.

The first recipe we cooked was Garlicky, Buttery, Spicy Calamari with Israeli Couscous.  I called a few places in the Burg looking for calamari.  I tried the Asian market by Best Buy and E & L Triangle Seafood on Hardy.  Both places described to me a frozen package of squid that cost $20.  The Asian Market was willing to sell me a whole squid.  I just don’t see squid as a regional flavor for south Mississippi, so I went with the “fruit of the sea” as dear old Bubba Gump so adequately described them:  gulf shrimp.  I always buy my shrimp from E & L.  They also sell boiled crabs and Leidenheimer poboy bread by the loaf.  That’s worth going in there alone.

This meal came together super fast.  I had the whole thing cooked in less than 30 min (maybe longer if my shrimp hadn’t been de-headed).  I went with steamed broccoli for our side item.  The broccoli and couscous cooked while I tossed the shrimp in the pan with the olive oil, butter, chili flakes, parsley and garlic.  A squirt of lemon, salt and pepper finished the saucy shrimp.  I tossed it  together in the pan with the couscous, and that was dinner.  The Little Guy didn’t eat much of it, but I think the second pinch of chili flakes made it a tad too spicy for him.  The Big Guy loved it.  He said even though he’s never had it with calamari, he’s pretty sure it is better with shrimp.  Lucky for him, we’ll never find out.  I’ll definitely be making this again, but with a little less spice to please the little one.


Hattiesburg could really use an Indian restaurant.  Instead of another Chinese or Japanese place, could we get some Indian food, please?

I’m in love with Indian food.  I don’t mean the Americanized version of thick, gloppy messes of sweet coconut milk laden blobs atop mushy rice either.  Before this mini obsession of mine, that’s all I thought Indian food was.  And I didn’t like it a bit.  I’m in love with real deal curries and dals with yogurt dressings and fresh veggies spiced beyond imagination.
The first Indian food I’d ever tried and actually enjoyed was in Vietnam, surprisingly.  We had a free afternoon to explore while studying abroad, and I went to this small Indian place some other students found.  They ordered for me and I was blown away.  It was one of the best things I ate in the four weeks I was there.  I didn’t eat much Indian after that for a few reasons:  one, for lack of Indian restaurants (not the most popular cuisine in south Mississippi), and two, apprehension of the unknown.

Fast forward to a few years ago and a friendship that started over daycare and coffeehouse dates for chai tea.  My new friend wanted to come over to cook for us as a thank you for having her over a few times.  She was going to cook us an Indian dish that a friend of hers taught her how to make.  Someone else doing the grocery shopping AND cooking??  No way would I turn that down.  So I watched and drank wine as she chopped and mixed up one of the tastiest things I ever put in my mouth.  No coconut milk required.  And I was hooked.  I had to learn more.

Indian food is such a beautiful combination of savory, spicy, and fresh tastes.  Its fragrant bouquets of garlic, ginger, coriander, cumin, and cilantro challenge your senses.  The spiciness from the various peppers awakens your taste buds.  And the simplicity of it all is the piece de resistance.  Many recipes only require few ingredients that are likely already in the pantry or fridge.  While being exotic in many ways to us simple southern folk, the homeliness of a pot of lentils and vegetables served with rice is reminiscent of grandma’s pot of beans and cornbread for Sunday dinner.

My first few experiments with the new recipes proved a bit challenging.  Acquiring all the proper spices was my first investment.  Most of them I found at Corner Market.  I did have to visit Kitchen Table (darn, hate to have to go there J)  for some cardamom.  And I was recently gifted with a nice garam masala blend on my last trip to Portland to round out my collection.  My next challenge was to understand the basics of flavor combinations and methods.  Many dishes require heating the oil to very high heat, “cooking” the spices for a few minutes, and then adding the oil/spice mixture to whatever you have cooked.  My first dal was so fun.  I was amazed at the change of color and consistency that took place after adding the oil mixture.  The broth surrounding the little legumes went from a drab gray to yellow and orange and immediately thickened to a creamy texture.  One mistake I always try to make is to overwhelm myself and cook too many things at once.  As I’ve been reading Madhur Jaffrey, I understand that traditional Indian meals are served as several dishes at once.  While I find this fun to do when entertaining and time permits, it’s not necessary for a simple weeknight meal.  One or two offerings are sufficient to satisfy that spicy craving.  The dishes can always be complemented with simple vegetable side dishes and fruit that don’t require much more time to prepare.

I couldn’t remember the exact recipe for my friend’s dish, so I turned to Smitten Kitchen for direction.  Turns out the dish I loved so much is called chana masala.  It’s traditionally made without meat, but a meal isn’t a meal without some meat according to my husband, so usually I add chicken to ours.  My first few attempts at this dish revolved around a jar of Pataks paste stuff (also found at Corner Market).  While it tasted fine, I wanted to make it a little more authentic and lower in fat (that stuff has a lot of oil).  I adapted my method more to Smitten Kitchen’s recipe that she adapted from Madhur Jaffrey.  The beauty of this dish is that it can be altered in so many different ways with the amount of heat, types of veggies added (potatoes would be great here too), and spiciness you desire.  This is excellent served atop jasmine or brown rice with plain yogurt on the side.

1 tablespoon vegetable oil
2 medium onions, minced
1 clove garlic, minced
2 teaspoons grated fresh ginger
1 jalapeno, minced
1 tablespoon ground coriander
2 teaspoons ground cumin
1/2 teaspoon ground cayenne pepper (can be omitted for less heat)
Couple pinches crushed red pepper
1 teaspoon ground turmeric
juice of one lime
2 teaspoons paprika
1 teaspoon garam masala (I increase to 2 tsp for more flavor)
2 cups tomatoes, chopped small or 1 15-ounce can of whole tomatoes with their juices, chopped small
2/3 cup water (or more for more sauce)
4 cups cooked chickpeas or 2 (15-ounce) cans chickpeas, drained and rinsed
1 pound boneless, skinless chicken, breasts or thighs, cut in bite sized pieces
1/2 teaspoon salt

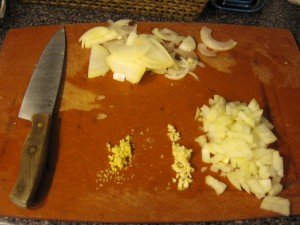
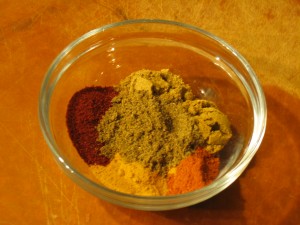
Heat oil in a large skillet.  Add onion, garlic, ginger, jalapeno pepper, and crushed red pepper and saute over medium heat until browned, about 5 minutes.  Turn heat down to medium low and add the coriander, cumin, cayenne, turmeric, paprika, cayenne, and garam masala.  Cook onion and spices for a minute or two, then add the chicken.  Cook until chicken is just done, about 8 minutes.  Add the tomatoes and stir, scraping up any bits that are stuck to the pan.  Add the chickpeas and water.  Simmer uncovered for at least 10 minutes (can go longer).  Stir in lime juice.  Season with salt to taste.

spice magic

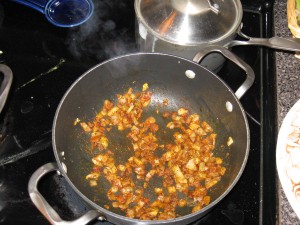
browning the spices with the onion, garlic, and ginger

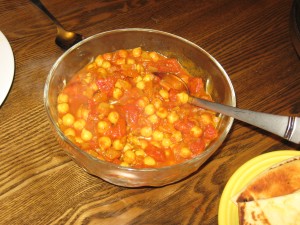
no chicken tonight and just as tasty

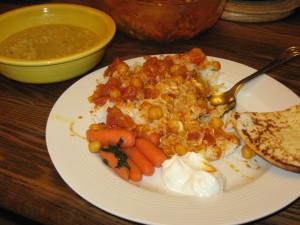
Indian food heaven

Dig In!

. . .to info on food finds and events in Hattiesburg and surrounds, restaurant reviews, and perhaps a few recipes and entertaining ideas. We hope you’ll find it a good read and that you’ll put your two cents in too.
Eat Twin Forks on Facebook